Extension Spring Calculator Instructions
Visit Our Free Online Spring Calculator!
Spring Creator is the leading spring calculator tool. This spring calculator will calculate the force and elasticity of your spring when it comes to loads, rate, and distance traveled. The following indications will show how to use the Spring Creator tool as well as how its many features, like the opportunity of purchasing stock springs will benefit your testing and prototyping stage.
Step 1.
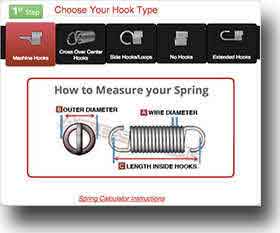
Machine Hooks:
Most cost-effective and commonly used type of coil tension spring hooks. This kind of hooks develops from the center of the spring.
Cross Over Center Hooks:
These are also a frequent type of extension spring hooks. It will provide you with 25% longer hook lengths than machine hooks therefore providing you with a full loop hook. They are made by raising the last coil and bending the ending part of the wire towards the center of your extension spring’s diameter thus crossing the center.
Side Hooks / Loops:
Side hooks/loops are related to cross over center hooks but are more cost-effective since the additional labor of bending the coil to the center of the diameter is eliminated. Side hooks/loops are formed from the side of the coil and not the center. These loops are a good choice if you’re required to place the hook on a side plate or a hole to the side where there is no room for the coil tension spring’s body and just the side hook/loop.
Extended Hooks:
Least cost-effective hook type. This kind of hooks is required when you need for your spring to have a shorter body length (less coils) making it favorable to make the hook lengths longer. Extended hooks are also a good option when you ned a long hook to be capable of getting into hard-to-reach places or to install your spring in a hole or around a wall where there is no room for the spring body.
No Hooks:
Coil tension springs with no hooks are utilized when the customer decides that instead of utilizing hooks, they will utilize a threaded bolt on each end to thread into the coil tension spring’s inner diameter for more cycles of life and to evade hook breakage. Utilizing all thread or a threaded bold to screw into the tension spring’s inner diameter on the spring ends will grant the customer to be able to utilize the “maximum safe travel” regardless of hook stress. Extension springs without hooks are also used to make garter springs.
Choose Your Type of Hooks


Step 2.
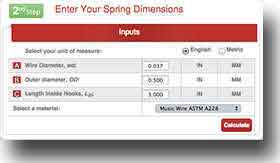
This is where you actually enter your tension spring dimensions. The measurements required are wire diameter, outer diameter, length inside hooks, and material type. Once you have entered these dimensions, you may click on “calculate” and obtain the outcome for your tension spring design.
To measure your extension spring’s length inside hooks, see the figure “How to Measure Your Spring” or measure from within the inside of the hooks. You could also determine this dimension by duplicating the wire diameter and subtracting the product from the overall length of your extension spring.
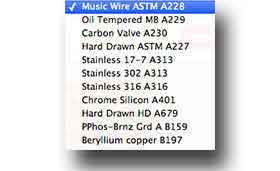
Our extension spring calculator also gives you the opportunity to choose from different material or wire types. Wire types have diverse tensile strengths and some are specially required to meet certain requisites like harsh environments. If your extension spring isn’t going into a high temperature or corrosive environment and you don’t need to meet any special requirements, music wire is the best and most cost-effective option. For more information regarding spring materials, please visit our “properties of common spring materials” page.
Enter Your Spring's Dimensions
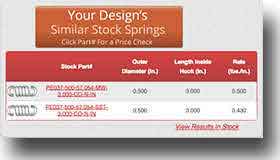
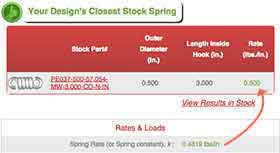
Similar Stock Springs and Closest Stock Spring
As you design your tension spring, Spring Creator will explore our vast extension spring catalogue to resolve if your spring is available for prompt purchase. We can also present you with the closest in stock to help in your testing stages by saving you time and money.
Step 3.
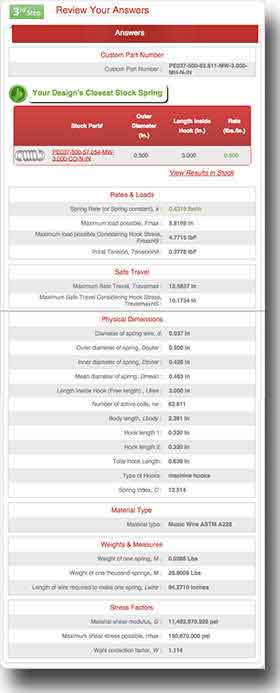
This is the section where you obtain the outcome of your tension spring design. From the slightest detail, like inner diameter, to the most important details like spring rate. You will find it all using Spring Creator.
Rates and Loads:
In this section you find out the strength of your tension spring. The extension spring rate will be advertised in green because it is “the master” of your spring calculations. Rate resolves how much load you will require to be able to travel or extend your extension spring to your required extended length and vice versa. Your design’s closest spring in stock is provided above the rates and loads section and you will notice that the spring rate for that spring design is also advertised in green. This is to show you that it is the spring with the closest spring rate to the one on your design. Below spring rate, you are provided with three more values: maximum load possible, maximum load possible considering hook stress, and initial tension. The distinction between maximum load possible and maximum load possible considering hook stress is that maximum load possible is the load you would be able to reach if you were to decide to make this spring without hooks. Maximum load considering hook stress, on the other hand, is the maximum load you will be able to reach with the type of hooks and material you chose for your spring before breaking point. Initial tension is simply the force stored in between your extension spring’s coils which keeps the coils together. This value is added on to the calculation of your working loads as an additional value and it does not increase like rate does. Initial tension is released once you have extended your spring to the point where you can see light in between the coils.
Safe Travel:
This area gives you information respecting how much you will be able to safely extend your spring. You are also given to different values in this section: maximum safe travel and maximum safe travel considering hook stress. Much the same to the load values, maximum safe travel is the amount of travel you will reach if you decide to make your spring without hooks while maximum safe travel considering hook stress is the maximum travel you will achieve out of your spring with the hooks and material type you chose.
Physical Dimensions:
You’ve already entered some of your spring’s measurements inn step two but here you are given some more thorough information respecting your extension spring’s physical dimensions. The dimensions you are given are inner diameter, mean diameter, active coils, body length, spring index, hook length 1, hook length 2, type of hooks, and total hook length. Mean diameter is the diameter between your spring’s outer and inner diameters and it is utilized in conjunction with the wire diameter to calculate your extension spring’s index. Spring index is the proportional ratio between your spring’s outer diameter and wire diameter. This helps to determine the amount of difficulty it will take to manufacture you spring. The overall amount of coils on your tension spring is active coils. Active coils help to calculate the body length which is the length of your extension spring without the hooks. Hook lengths 1 and 2 are the lengths of each individual hook; these values are added together to calculate your spring’s total hook length.
Material Type:
This area gives you the material type you chose your spring to be made out of.
Weights and Measures:
In this particular section, you are given the weight of your spring as well as the weight of one thousand springs of the same design. You are also provided with how much wire it’ll take to make one spring. The information provided here will help your spring’s manufacturing phase s well as shipping.
Review Your Answers
Step 4.
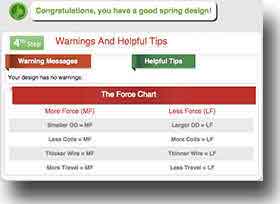
This area gives you specific warnings respecting your spring design and provides you with tips on how you can make adjustments so that you generate a reliable spring design. You are also able to see our force chart if you happen to need to make your spring stronger or weaker. For example; for more force you would have to either make the outer diameter smaller, reduce the amount of coils, increase the wire diameter, or make the free length longer to make more travel. On the other hand, for less force, you would do the exact opposite; make the outer diameter larger, increase the amount of coils, make the wire diameter smaller, or make the free length shorter thus giving you less travel to your desired loaded height. The warnings and tips/adjustments given are the following:
Warning: Your index is too small (below 4) which makes it difficult to manufacture.
Tip: In order to increase your index, you will need to increase your outer diameter or decrease your wire diameter.
Warning: Your index is too large (above 15).
Tip: In order to increase your index you will need to decrease your outer diameter or increase your wire diameter.
Warning: Your inputs have generated invalid or negative answers.
Tip: Please adjust your inputs accordingly
Warning: Hook length 1 + Hook length 2 is greater than or equal to your length inside hooks.
Tip: Your combined hook length cannot exceed your length inside hooks. To fix this problem please increase the length inside hooks, decrease your wire diameter, decrease your outer diameter, or if you are using extended hooks please decrease your hook lengths.
Warning: Hooks are high stressed.
Tip: The stress that is being put on the hooks of this spring exceeds the maximum psi limits of the wire. The hooks may break and fatigue due to stretching the spring past the maximum safe travel considering hook stress value. To fix this problem, here are some options: change the wire type to a stronger material, increase the wire diameter, or increase the outer diameter of the spring.
Warning: The force in L2 is less than the force in L1.
Tip: Your L2 must be greater than your L1. The formula for load is: rate * distance traveled = load. Thus if your distance for L2 is greater than L1, your lost at L2 must be greater.
Warning: Your load exceeds the max safe load.
Tip: If you need to reach a load that takes you beyond the max load, you need to change your input values. Here are some options: increase the number of coils, increase the outer diameter, or decrease the wire diameter.
Warnings and Helpful Tips

Step 5.
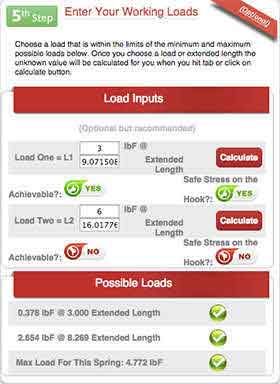
Pick a load that is between the limits of the maximum and minimum loads possible shown below. Once you have picked a load or extended length, the unidentified amount will be calculated automatically when you click on calculate or press the tap key.
Note: You shall enter a load amount that is in between the possible loads table that is provided underneath the load inputs. If you choose a load that’s NOT possible or beyond the maximum load possible considering hook stress, the extension spring calculator will present a red thumbs-down icon notifying you that you’ve exceeded the maximum load possible considering hook stress displayed on step 3. If you input a possible load the extension spring calculator will present a green thumbs-up icon notifying you that the load amount is possible. The same procedure will apply if you enter your desired extended length. Exceeding these values is not suggested due to the fact that your extension spring shall take a set thus not being able to return to its unloaded state or you could cause breakage. If you require more travel add more coils or make your outer diameter larger and increase your wire diameter.
Enter Your Working Loads
Step 6.
Generate Blueprint:
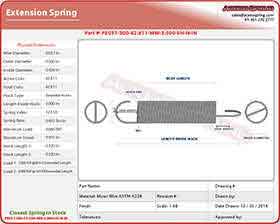
Click here to receive a real time blueprint of your spring design. This blueprint is editable. You shall get a full spring blueprint with all the details a spring company will require to manufacture your spring. The editable inputs provided are part name, part number, drawing number, drawn by, revision number, tolerances, approved by, finish (plating) and manufacturing notes. When you have finished editing your blueprint, you shall click on on “update blueprint” and all the inputs you entered shall be updated and will show on your extension spring blueprint.
blueprint
Get a Quick Quote of Your Spring Design:
By clicking here, you are able to send us a quick quote. The blueprint of your spring will automatically be attached to your request.

Email Design & Blueprint:
When you are satisfied with your blueprint, you may select this option and email the PDF blueprint to yourself, colleagues, and possible clients without leaving our spring calculator app thus increasing productivity and performance.

Similar Springs in Stock:
Click here to see similar springs in stock and the closest spring in stock; all ready for immediate purchase. As you work on your spring design, Spring Creator, will explore our massive spring catalogue to determine if your spring is accessible for prompt purchase. This will help you in the prototyping and testing phases thus saving you time and money.


 English